Published Dec 17, 2014 · archedraft
What about an El Capitan VM?
Acknowledgements:
- peter_sm – wouldn’t have gotten this working without his expertise and teamwork!
- The authors in the references below – thanks for the guides.
Prerequisites:
- Working unRAID 6 Server
- Bridge Enabled (Settings -> Network Settings -> Setup Bridge: Yes & Bridge name: br0)
- Windows or Linux VM (This is not needed to install OS X but would be good to practice setting up a VM before attempting this)
- 64 Character OSK Key (You will need a real Mac to get this and I will NOT provide one). Read the references below for more information on this.
- chameleon_svn2510_boot (See info below)
- Mac Files (contains “chameleon_svn2510_boot” & “org.chameleon.boot.plist”)
Step 01 – Creating a bootable Yosemite ISO:
- Download the Yosemite.app from the Mac App Store.
- Open Terminal and do the following:
# Mount the installer image
hdiutil attach /Applications/Install\ OS\ X\ Yosemite.app/Contents/SharedSupport/InstallESD.dmg -noverify -nobrowse -mountpoint /Volumes/install_app
# Convert the boot image to a sparse bundle
hdiutil convert /Volumes/install_app/BaseSystem.dmg -format UDSP -o /tmp/Yosemite
# Increase the sparse bundle capacity to accommodate the packages
hdiutil resize -size 8g /tmp/Yosemite.sparseimage
# Mount the sparse bundle for package addition
hdiutil attach /tmp/Yosemite.sparseimage -noverify -nobrowse -mountpoint /Volumes/install_build
# Remove Package link and replace with actual files
rm /Volumes/install_build/System/Installation/Packages
cp -rp /Volumes/install_app/Packages /Volumes/install_build/System/Installation/
# Copy Yosemite installer dependencies
cp -rp /Volumes/install_app/BaseSystem.chunklist /Volumes/install_build/BaseSystem.chunklist
cp -rp /Volumes/install_app/BaseSystem.dmg /Volumes/install_build/BaseSystem.dmg
# Unmount the installer image
hdiutil detach /Volumes/install_app
# Unmount the sparse bundle
hdiutil detach /Volumes/install_build
# Resize the partition in the sparse bundle to remove any free space (If this step does not work, try manually typing in this command, WordPress keeps messing up the format of the special characters)
hdiutil resize -size `hdiutil resize -limits /tmp/Yosemite.sparseimage | tail -n 1 | awk ‘{ print $1 }’`b /tmp/Yosemite.sparseimage
# Convert the sparse bundle to ISO/CD master
hdiutil convert /tmp/Yosemite.sparseimage -format UDTO -o /tmp/Yosemite
# Remove the sparse bundle
rm /tmp/Yosemite.sparseimage
# Rename the ISO and move it to the desktop
mv /tmp/Yosemite.cdr ~/Desktop/Yosemite.iso
#Add KERNEL
- Mount Yosemite ISO by double clicking Yosemite.iso
- Download Pacifist
- With Pacifist browse to /System/Installation/Packages/Essentials.pkg
- Extract the folder & file (Kernels/kernel) to /System/Library/ on the Yosemite.iso
- ***Disregard this step: this is a note /System/Library/Kernels/kernel
Step 02 – Mac OS X Installation Disc Image:
- ssh into unRAID
- move to the directory where you want your Mac OS X image to live.
- cd /mnt/cache/vm_images/default/
- qemu-img create -f raw Yosemite.img 120G
Step 03 – Get chameleon_svn2510_boot:
- Copy the file linked above to your cache drive and you’re done with step 03 or:
- Go to this site: http://www.insanelymac.com/forum/files/download/59-chameleon-23-svn/
- Download the file: i386_v2510.zip
- Extract the file called boot
- Rename boot to chameleon_svn2510_boot
- Move this file to your unRAID server (I moved mine to: /mnt/cache/vm_images/extra)
Step 04 – Install OS X:
- Go to the KVM tab in unRAID -> Add VM -> Template: XML Expert -> Copy the config below & fill in the RED text with your own settings:
<domain type='kvm' xmlns:qemu='http://libvirt.org/schemas/domain/qemu/1.0'>

<name>OSX-Yosemite-10.10</name>

<uuid>0ba39646-7ba1-4d41-9602-e2969a3fc26d</uuid>

<metadata>

<type>None</type>

</metadata>

<memory unit='KiB'>4194304</memory>

<currentMemory unit='KiB'>4194304</currentMemory>

<vcpu placement='static'>2</vcpu>

<cputune>

<vcpupin vcpu='0' cpuset='0'/>

<vcpupin vcpu='1' cpuset='1'/>

</cputune>

<resource>

<partition>/machine</partition>

</resource>

<os>

<type arch='x86_64' machine='pc-q35-2.3'>hvm</type>

<kernel>/mnt/cache/vm_images/extra/chameleon_svn2510_boot</kernel>

<boot dev='cdrom'/>

<bootmenu enable='yes'/>

</os>

<features>

<acpi/>

</features>

<cpu mode='custom' match='exact'>

<model fallback='allow'>core2duo</model>

</cpu>

<clock offset='utc'/>

<on_poweroff>destroy</on_poweroff>

<on_reboot>restart</on_reboot>

<on_crash>destroy</on_crash>

<devices>

<emulator>/usr/bin/qemu-system-x86_64</emulator>

<disk type='file' device='disk'>

<driver name='qemu' type='raw'/>

<source file='/mnt/cache/vm_images/default/Yosemite.img'/>

<target dev='hda' bus='sata'/>

<address type='drive' controller='0' bus='0' target='0' unit='0'/>

</disk>

<controller type='usb' index='0'>

<address type='pci' domain='0x0000' bus='0x02' slot='0x01' function='0x0'/>

</controller>

<controller type='sata' index='0'>

<address type='pci' domain='0x0000' bus='0x00' slot='0x1f' function='0x2'/>

</controller>

<controller type='pci' index='0' model='pcie-root'/>

<controller type='pci' index='1' model='dmi-to-pci-bridge'>

<address type='pci' domain='0x0000' bus='0x00' slot='0x1e' function='0x0'/>

</controller>

<controller type='pci' index='2' model='pci-bridge'>

<address type='pci' domain='0x0000' bus='0x01' slot='0x01' function='0x0'/>

</controller>

<interface type='bridge'>

<mac address='52:54:00:00:20:20'/>

<source bridge='br0'/>

<model type='e1000-82545em'/>

<address type='pci' domain='0x0000' bus='0x02' slot='0x03' function='0x0'/>

</interface>

<input type='mouse' bus='ps2'/>

<input type='keyboard' bus='ps2'/>

<graphics type='vnc' port='-1' autoport='yes' websocket='-1' listen='0.0.0.0'>

<listen type='address' address='0.0.0.0'/>

</graphics>

<video>

<model type='vga' vram='9216' heads='1'/>

<address type='pci' domain='0x0000' bus='0x00' slot='0x01' function='0x0'/>

</video>

<memballoon model='none'>

</memballoon>

</devices>

<seclabel type='none' model='none'/>

<qemu:commandline>

<qemu:arg value='-device'/>

<qemu:arg value='usb-kbd'/>

<qemu:arg value='-device'/>

<qemu:arg value='usb-mouse'/>

<qemu:arg value='-device'/>

<qemu:arg value='isa-applesmc,osk=64_Character_OSK_Key'/>

<qemu:arg value='-smbios'/>

<qemu:arg value='type=2'/>

<qemu:arg value='-device'/>

<qemu:arg value='ide-drive,bus=ide.1,drive=MacDVD'/>

<qemu:arg value='-drive'/>

<qemu:arg value='id=MacDVD,if=none,snapshot=on,file=/mnt/cache/vm_images/installer/Yosemite.iso'/>

</qemu:commandline>

</domain>- **NOTE** If your CPU is AMD you must add the following to the above XML config (above the </qemu:commandline> line) :
<qemu:arg value=’-cpu’/>
<qemu:arg value=’core2duo,vendor=GenuineIntel’/> - Now start the VM and click on “VNC Remote”
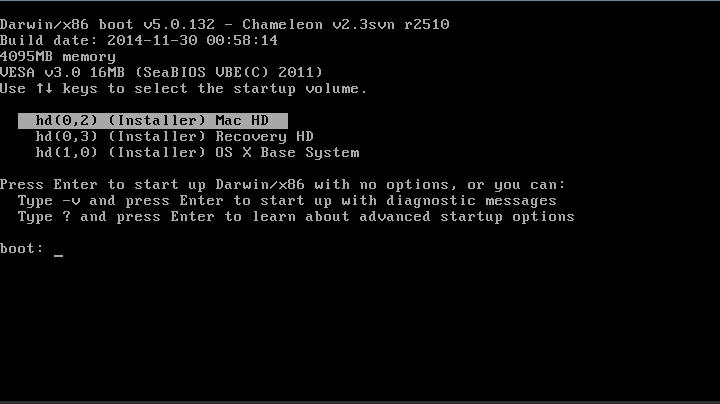
- Now you should see the Chameleon boot prompt:
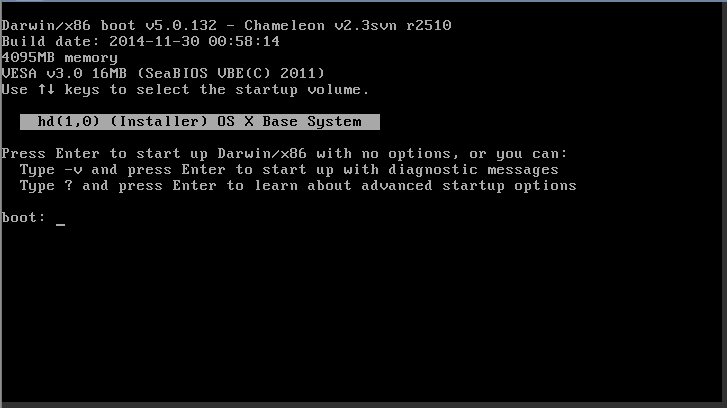
- You can use -v for a verbose boot which can aid in troubleshooting. If you get a kernel panic here, If your terminal is filled with usb-kbd: warning: key event queue full and the keyboard doesn’t respond, just try again. While the keyboard works reliably once OS X boots, it sometimes has problems on the Chameleon boot prompt. Hopefully the installer should just start right up.
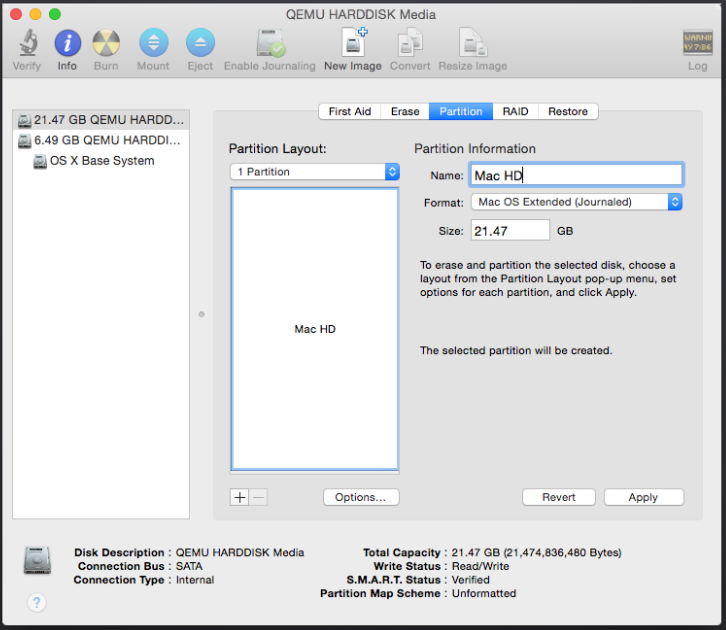
- Continue with the installer and start up Disk Utility to partition your drive to Mac HD (The mouse is going to be laggy until we get everything installed) Hint: Move the mouse faster to get the cursor to move farther.
- Close Disk Utility and install to the disk partition you just created.
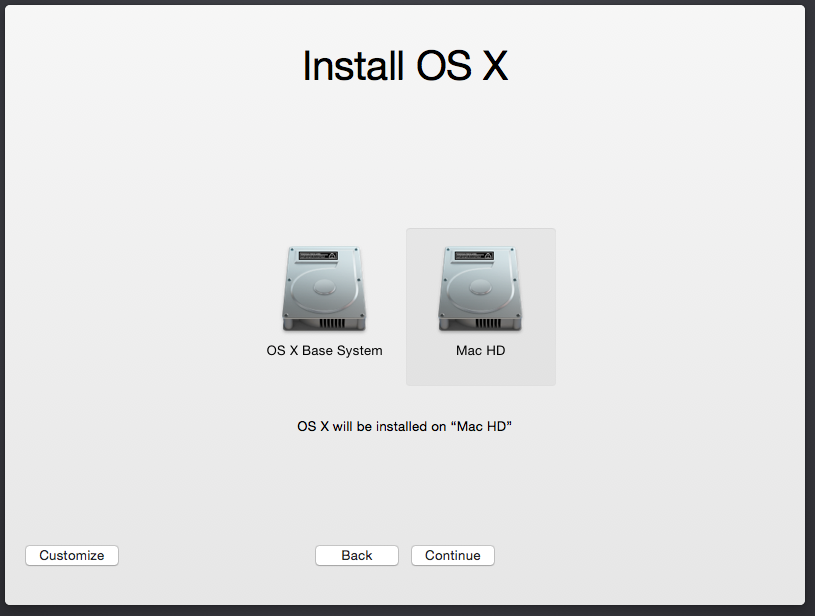
- The installer will reboot and put you back on the Chameleon prompt. Choose the (Installer) Mac HD partition to continue with the install.
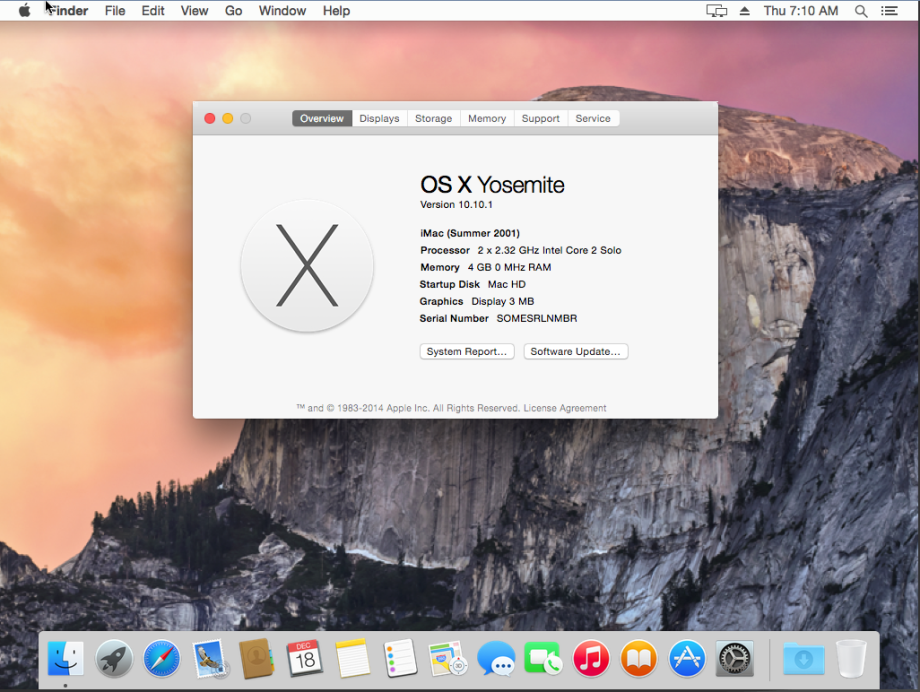
- The install will continue. I skipped setting up an Apple ID and registering. Now you should have a mostly functional Mac OS X installation!
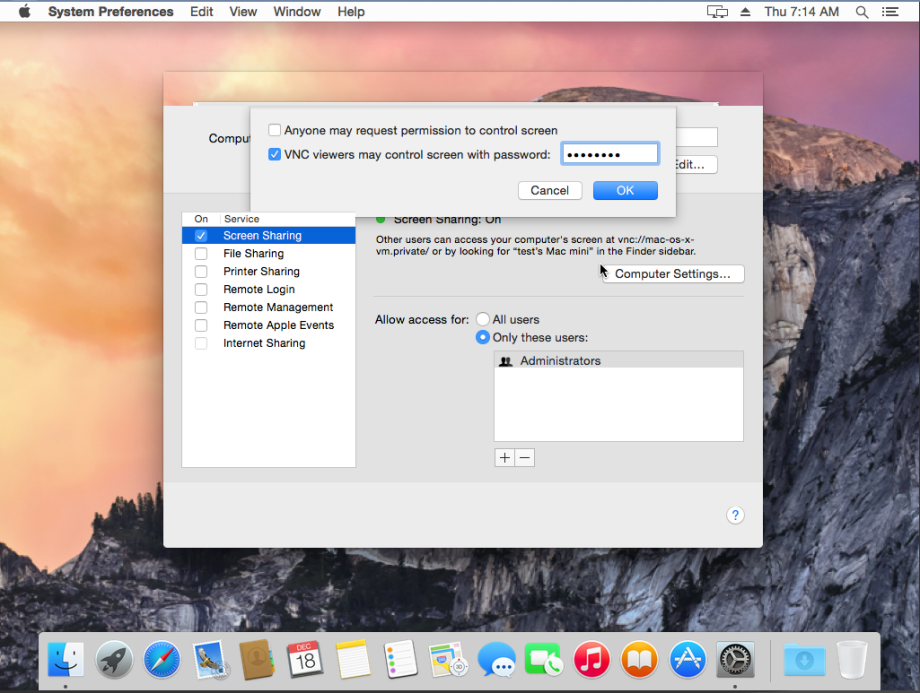
- Now lets get Absolute Mouse Positioning working:
Most KVM guests can make use of the tablet device to synchronize the position of the mouse with it’s position over the VNC window. OS X, unfortunately, does not support this device. If you enable OS X’s internal screen sharing and use it in place of QEMU’s VNC server then mouse positioning works perfectly. Go to “System Preferences” -> “Sharing” -> enable “Screen Sharing” -> “Computer Settings…” -> add a password.
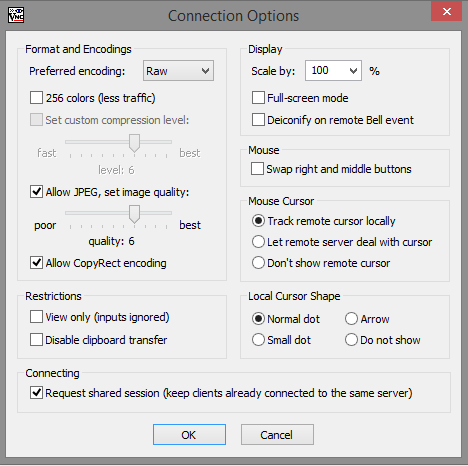
- Then connect to the Mac using TightVNC and the mouse positioning should be perfect. Here are the TightVNC “Options…” settings:
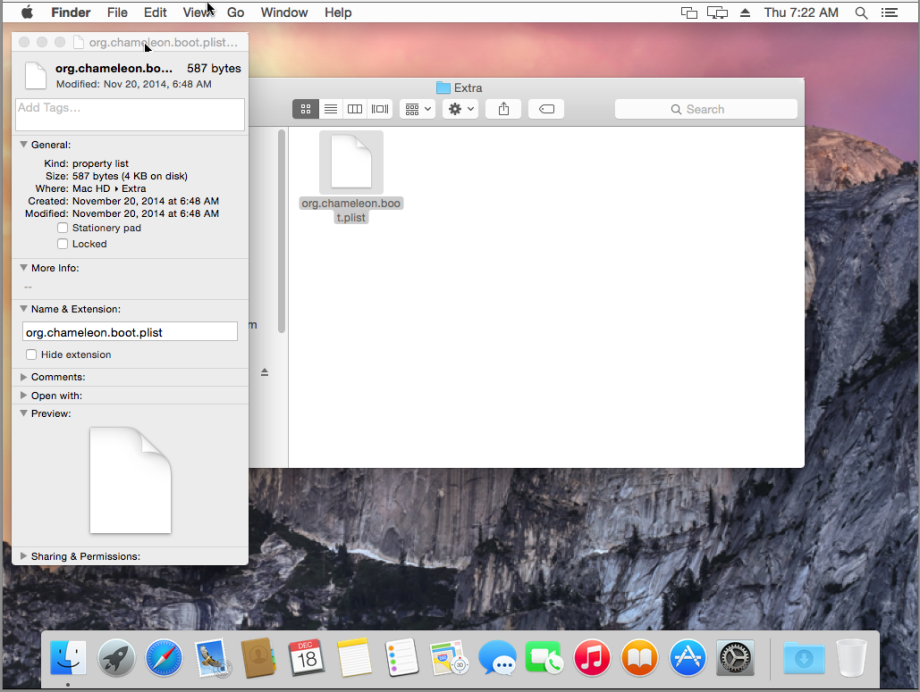
- Now go to “Computer” -> “Mac HD” -> create a new folder called “Extra”.

- Open a text editor and save the following as org.chameleon.boot.plist (or copy the file linked above into your created Extra folder).
<?xml version="1.0" encoding="UTF-8"?>

<!DOCTYPE plist PUBLIC "-//Apple//DTD PLIST 1.0//EN" "http://www.apple.com/DTDs/PropertyList-1.0.dtd">

<plist version="1.0">

<dict>

<key>Timeout</key>

<string>5</string>

<key>EthernetBuiltIn</key>

<string>Yes</string>

<key>PCIRootUID</key>

<string>1</string>

</dict>
- Shut down the VM
- Edit your XML file and remove the following:
- <qemu:arg value=’-drive’/>
<qemu:arg value='ide-drive,bus=ide.1,drive=MacDVD'/>

<qemu:arg value='-drive'/>

<qemu:arg value='id=MacDVD,if=none,snapshot=on,file=/mnt/cache/vm_images/installer/Yosemite.iso'/> - Now start the VM and you should be able to log into the app store.
- The virtio network driver does not work on Yosemite as of this post. I have been using the e1000 driver.


Step 05 – USB Passthrough:
- Disclaimer: Your motherboard & CPU must support VT-x & VT-d and be enabled in the bios or you will not be able to passthrough PCI devices.
- Normally you could just add each USB device individually with the following:
- <hostdev mode=’subsystem’ type=’usb’ managed=’no’>
<source>
<vendor id=’0x0500’/>
<product id=’0x14f7/>
</source>
</hostdev> - Due to the line <key>PCIRootUID</key> <string>1</string> in the org.chameleon.boot.plist file this will not work. (without the PCIRootUID line the App Store will not accept your username and password)
- If you want USB Passthrough to work you will need to passthrough an entire USB PCI Controller
- See Guide
Step 06 – GPU Passthrough:
- Disclaimer: Your motherboard & CPU must support VT-x & VT-d and be enabled in the bios or you will not be able to passthrough PCI devices.
- You will probably want to try and get a GPU working, but that is easier said than done. Mac’s are very picky about which GPU’s work. Google is your friend.
- I bought a Sapphire Radeon HD 6450 that works out of the box without any modifications. (This is rare for the GPU card to work without modifications / graphic kexts / graphic injectors)
- XML Code for the Radeon GPU:
- <qemu:arg value=’-device’/>
<qemu:arg value=’ioh3420,bus=pcie.0,addr=1c.0,multifunction=on,port=1,chassis=1,id=root.1’/>
<qemu:arg value=’-device’/>
<qemu:arg value=’vfio-pci,host=02:00.0,bus=root.1,addr=00.0,multifunction=on,x-vga=on’/>
<qemu:arg value=’-device’/>
<qemu:arg value=’vfio-pci,host=02:00.1,bus=root.1,addr=00.1’/> - Remove the following from your XML
- <graphics type=’vnc’ port=’-1′ autoport=’yes’ websocket=’-1′ listen=’0.0.0.0′ keymap=’en-us’>
<listen type=’address’ address=’0.0.0.0’/>
</graphics>
<video>
<model type=’vmvga’ vram=’16384′ heads=’1’/>
<address type=’pci’ domain=’0x0000′ bus=’0x00′ slot=’0x01′ function=’0x0’/>
</video> - Your millage will vary.
EXTRA:
- If you want a larger VNC screen do the following:
- Add this to the bootloader config in /Extra/org.chameleon.boot.plist:
- <key>Graphics Mode</key>
<string>1440x900x32</string>
References:
http://forums.macrumors.com/showthread.php?t=1763439
http://blog.ostanin.org/2014/02/11/playing-with-mac-os-x-on-kvm/

Thanks for the instructions. I’ve posted for help on the unRAID forums, but maybe you can help me here. I was able to get everything up and running. I shut down the VM at step 15, and I can’t get it to reboot, webGUI just says error. My other VMs continue to work fine. I’ve destroyed the VM and rebuilt it from scratch. I’ve created new disk images. I’ve rebooted the server, but still no luck. Any idea what could be up?
LikeLike
ssh into unRAID and type “virsh start OSX-Yosemite-10.10” or whatever you named your VM. That should give you a better idea what is going on.
LikeLike
This is a great write up, and hopefully it can be more broadly disseminated to the unRAID community (not sure how they feel about getting tangled up in the Apple VM web). There are a few typos above that are causing some problems.
1. The line for “# Resize the partition in the sparse bundle to remove any free space” should read
hdiutil resize -size `hdiutil resize -limits /tmp/Yosemite.sparseimage | tail -n 1 | awk ‘{ print $1 }’`b /tmp/Yosemite.sparseimage
(the apostrophe after { print $1 } in the original text is too smart for it’s own good)
2. Step 17 should read
(you are missing the first line )
Also, the link for Mac Files at the top doesn’t work.
Thanks again for the great write up. I’ve got a Yosemite VM up and running again on unRAID 6.
LikeLike
Thanks for the feedback! Made the changes to the guide above. I’m glad you have it up a running.
LikeLike
Thanks you for putting this together. Extremely useful
One item that I tripped on and was unclear on is that the hard disk file need to be created and is what is needed by the “/mnt/cache/vm_images/default/Yosemite.qcow2” entry. I ended up doing this by ssh into the system, then going to the drive I am keeping the VMs on , and using “qemu-img create -f qcow2 mac_hdd.qcow2 200G”
I am in the install but unable to control the mouse to go through the different screens. It is crazy how bad it is ! I am not sure how to navigate with just the keyboard effectively
LikeLike
Updated the guide to use the qemu-img create command. The VM Manager plugin changed on me 🙂
LikeLike
Hello there – thanks for this awesome guide! I am trying to get this to work on a Ubuntu box running standard WebVirtMgr on top of libvirt since I have no need of any of the other features of unRAID. Sadly, I am not able to get Yosemite to actually install on this build.
When I start the installer I get some complaining about “EBIOS read error: Error 0x0c” and then I get the following:
“Errors encountered while starting up the computer. Pausing for 5 seconds.”
Has anyone managed to get this to install successfully on anything other than unRAID? I’m thinking perhaps there are kernel differences – may try building a git pull of the latest kernel or similar but this seems very strange that you guys are able to get this to work so easily.
LikeLike
What version of seabios is being used? The “EBIOS read error: Error 0x0c” errors come from chameleon, which talks to the bios to read the disk.
LikeLike
SeaBIOS (version rel-1.7.5-0-ge51488c-20140602_164612)
Hopefully that helps – It looks like 1.7.5 is the newest major release but perhaps a patchset is needed?
LikeLike
There is a 1.7.5.1 – and I did 1.7.5 also; and qemu 2.1.2 & 2.2. I suspect unraid have them older.
LikeLike
Hello Hin-Tak,
Just to clarify on this – so you have managed to install Yosemite on a different platform using SeaBIOS 1.7.5? I’m just trying to figure out where you are with this – maybe we can help each other in getting this working! 🙂
LikeLike
No, I had Maverick working for months and still do, and had not had any luck with Yosemite; have the same EBIOS problem. unRAID seems to be quite old linux-based platform but I had not any luck fnding out what it ships.
LikeLike
I have made some progress… The “EBIOS read error: Error 0x0c” error seem to be a red herring. I have managed to boot beyond that point by doing:
echo 1 > /sys/module/kvm/parameters/ignore_msrs
Did you also have msr related errors in dmesg by any chance? (i.e. after failing, do “dmesg | grep msr” – does it say something about 0x199?)
There is an msr error which, if you follow the bread crumbs, corresponding to Yosemite trying to do CPU frequency scaling. I suspect it tried to query the CPU for CPU features first. Well, my CPU can do frequency scaling, but qemu/kvm’s emulation of getting at the frequency scaling status fails. with ignores_msrs set to zero (default), the darwin kernel crashes right away, hence the reboot; if set to 1, the kernel would continue to boot, but panic when some drivers (the IOFamily) tries to actually set CPU scaling.
This possibly explain why different people experience different things. It depends on CPU features – which depends on how old/new your CPU is, and especially if you are on a laptop (laptop CPUs often have that feature).
LikeLike
@Hin-Tak Leung – have you gotten past the “system uptime” hang? I ran the echo 1 command, but can’t boot beyond that. Running ArchLinux on a Lenovo TS140 w/ i3-4130. I get the 0x1999 errors when running “dmesg | grep msr” after the system uptime hang.
LikeLike
What version of seabios is being used? The “EBIOS read error: Error 0x0c” errors come from chameleon, which talks to the bios to read the disk.
LikeLike
Great writeup! Only issue I found was that the copy of chameleon_svn2510_boot from your Mac_Files.zip doesn’t work, the VM would just loop at the boot screen and not be able to find a boot source. The copy from insanelymac worked fine.
LikeLike
Superb guide! I can get everything going, but my VM hangs on the Apple Logo screen when booting for the first time. Any ideas?
LikeLike
Sounds like this is because of an AMD CPU. Not sure how to trick OS X into thinking you are running an Intel CPU.
LikeLike
That’s easy – pass the vendor option to the -cpu switch of qemu:
-cpu core2duo,vendor=GenuineIntel
see also http://www.ulduzsoft.com/2014/03/running-mac-os-x-under-qemukvm-on-amd-cpu/
LikeLike
I tried adding this to the XML, but no luck:
core2duo
GenuineIntel
LikeLike
what syntax? I don’t know the exact change for unRaid, but you probably need to change the corresponding section to something like this:
core2duo
GenuineIntel
i.e. adding the vendor option within the section.
LikeLike
Damn, wordpress swallows the xml’s. Let see if this works:
<cpu mode=’custom’ match=’exact’>
<model fallback=’allow’>core2duo</model>
<vendor>GenuineIntel</vendor>
</cpu>
LikeLike
@Tophicles and I were working on this on the unRAID form. We had tried the above but it wouldn’t start. After a bunch of trial and error putting the following at the end of the XML appears to have worked.
qemu:arg value=’-cpu’/>
qemu:arg value=’core2duo,vendor=GenuineIntel’/>
LikeLike
Could it be that the normal VM shutdown through the unRaid VM Webgui does not work with Mac OS?
LikeLike
Well still haven’t figured out a way to get unRAID to shutdown my OS X VM from the unRAID KVM GUI. I am guessing OS X doesn’t understand the KVM ACPI commands it is being sent. If I issue the command “virsh shutdown OSX-Yosemite-10.10” in a SSH session nothing happens either so I don’t think it is the unRAID web GUI. If anyone has had any success on getting OS X to shutdown or restart via any virsh method I would be very interested in hearing how you accomplished this.
LikeLike
Good to know that i am not the only one with this issue.
Dont know maybe there is a way by using a custom DSDT Table in conjunction with Chameleon? I know there is a fix_shutdown option in DSDT, but i dont know if that would change anything.
LikeLike
Not sure, but let me know what happens!
LikeLike
Hi, thanks for writing this up. I was able to successfully installed Yosemite using your steps. But I find mouse navigation is really sluggish. Although I have no issue passing through my NEC USB 2.0 and 3.0 cards to other Windows VM, I am having issue passing through to Yosemite. Is there any additional step that I need to do to make it work? I am setting this up on Arch Linux, btw. Here is my script snippet. I have comment the GPU passthrough lines until USB passes successfully.
=========================================
#!/bin/bash
…
OPTS=”$OPTS -device ioh3420,bus=pcie.0,addr=1c.0,multifunction=on,port=1,chassis=1,id=root.1″
…
# Graphic card passthrough
#OPTS=”$OPTS -device vfio-pci,host=01:00.0,bus=root.1,addr=00.0,multifunction=on,x-vga=on”
#OPTS=”$OPTS -device vfio-pci,host=01:00.1,bus=root.1,addr=00.1″
…
# USB 3.0 passthrough
OPTS=”$OPTS -device vfio-pci,host=03:00.0,bus=root.1,addr=00.2″
…
# USB 2.0 passthrough
OPTS=”$OPTS -device vfio-pci,host=0a:01.0,bus=root.1,addr=00.3″
…
# Start Mac OS X 10.10 Yosemite
sudo taskset -c 0-7 qemu-system-x86_64 $OPTS
==========================================
LikeLike
Step 04 #7 & #11 deals with the laggy mouse, Step 05 is the way I passed through my USB mouse & keyboard and Step 06 is how I passed through my GPU.
LikeLike
I’m having problems on the #Kernel part of the first step. I am using pacifist and have no problems with the program. I am on 10.8.5 while working on prepping the ISO. When you say “With Pacifist browse to /System/Installation/Packages/Essentials.pkg”, do you mean to browse to this location on the ISO that we have made for Yosemite or to browse to this location on the current mac that one is working on to get the ISO ready.
I have browsed to this location on the yosemite ISO, however there is no Kernel.
I have also tried to browse to this location on my current OSX install on the laptop I’m using to try and get the ISO prepped, but there is no such location (on 10.8.5 and have hidden files set to show).
Any input would be greatly appreciated. Everything up to this point has been smooth sailing and I’ve been scratching my head over this for about an hour.
LikeLike
With Pacifist, browse to /System/Installation/Packages on your mounted Yosemite ISO. You should see a file called “Essentials.pkg”, with Pacifist open that .pkg and extract both the folder and files of Kernels/kernel and place the folder and file into /System/Library on your mounted Yosemite.iso
I hope that helps
LikeLike
Your instructions are great. I’ve created the partition through Disk Utility but then I get an error “This is not a supported method of installing the operating system. Please run Install OS X 10.10.app that you downloaded from the app store.”
Any ideas on what I could try?
LikeLike
Are you using the OSX.app that was downloaded from the Mac Store?
LikeLike
Yes, it’s a download of the Install OSX Yosemite.app from a few months ago, which I’ve then converted into an iso as per your instructions. I’ve booted from it, created a Mac partition, but then when I use the ‘Reinstall OS X’ option from the OSX Utilities Menu, I get the “This is not a supported method of installing the operating system.” error.
LikeLike
Just tried the “Reinstall OS X” option and got the same message. I am not sure how to get past this but it almost certainly is a limitation/safe guard for Apple. Best bet is to create a new osx.img file and start from scratch if you want to install OS X. Then I would save a backup of your osx.img file that can be used as a “save point” if you ever need a fresh install.
LikeLike
I’ve created a new img file and still getting the same results. I’ll try downloading the Installer again.
LikeLike
Installed without issues after re-downloading the Installer.
LikeLike
Has anyone tried upgrading to OS X 10.11?
LikeLike
Nope, probably won’t try for a while. If you try, report back and let us know how it went. I would make a backup of your current OSX.img file first.
LikeLike
Yep, it got stuck installing it after the first reboot.
LikeLike
Did you install from scratch, or upgrade an existing working 10.10 installation?
LikeLike
I just tried to upgrade. maybe a clean install would work? I don’t have to time to try it right now but maybe over the weekend I can try and report back here if someone doesn’t do it first.
LikeLike
I’m guessing your going to need an updated bootloader that supports “El Captain”. It looks like this one is updated with the OS X 10.11 but I forget how I got the .boot file from it… My harddrive that houses my OS X VM just started having issues so I am attempting to backup my VM images from it now. Until I get that done I won’t be able to mess around with this.
http://www.insanelymac.com/forum/files/file/71-enoch/
LikeLike
im currently trying to run El Capitan in unraid, so i followed these instructions and simply replaced “Yosemite” with “ElCapitan” when necessary. i couldnt get the hdiutil resize step to work, kept getting “no such file errors” so i skipped that step. downloaded the Enoch r2779 bootloader, unzipped it and extracted “boot” from the .pkg file it using pacifist. “boot” is under “Contents of Core.pkg/usr/standalone/i386”
just renamed it to “chameleon_sv2779_boot”, uploaded it and put in the xml. im currently trying to boot into the installer, will update with the results
LikeLike
having some trouble with the “Waiting for DSMOS” phase, il try to get past it with a fakesmc.kext file
LikeLike
I was able to successfully upgrade to El Capitan using these steps.
– Followed the above to successfully install Yosemite
– Once installed, boot into Yosemite then download Clover EFI bootoader
– Install without UEFI (choose setting install boot0af in MBR)
– after the installation completes, copy /EFI/Clover/config.plist to ~/Desktop
– download and open Clover Configurator
– within Clover Configurator open ~/Desktop/config.plist
– in the RT Variables section change CsrActiveConfig to 0x3
– in the ACPI section uncheck FixLAN
– in the SMBIOS section run the wizard and select an appropriate template (for me 14.1)
– I am using a PowerColor R9 270 video card and had to inject a fakeid of 0x68101002 in the Devices section -> Fake ID -> ATI
– save ~/Desktop/config.plist
– replace /EFI/Clover/config.plist with the config.plist you just modified
– shutdown the VM
– in the unRAID OSX VM xml, delete the chameleon line
– boot your VM and it should load the Clover bootloader
– once booted back into Yosemite using the Clover bootloader, download Install OS X El Capitan Application from the Mac App Store. When complete, the app will open. Please note, the Application will disappear after use.
– Choose Yosemite system drive for install (Example: Macintosh HD). When complete, the computer will automatically reboot.
– When Clover boot screen appears, choose Boot OS X Install option (Example: Boot OS X Install from Macintosh HD). Choosing your system drive will go back to your previous installation without updating.
– Complete the OS X installation process. When complete, the computer will automatically reboot.
– When Clover boot screen appears, choose Boot Mac OS X option (Example: Boot Mac OS X from Macintosh HD). The computer will then complete the update.
– copy /EFI/Clover/config.plist to ~/Desktop
– in the RT Variables section change CsrActiveConfig to 0x67
– save ~/Desktop/config.plist
– replace /EFI/Clover/config.plist with the config.plist you just modified
– reboot and you’re done
LikeLiked by 1 person
I`l have to try this, thanks. i gave up on installing El Capitan as i couldnt get past waiting for dsmos. im gonna guess this will work for mavericks as well as thats what im using at the moment because Yosemite was gone from the store
LikeLike
Great guide!! Has anyone done it (and written a guide) for Mavericks, Mountain Lion, Lion, Snow Leopard, Leopard, Tiger? Yes, most people will run the latest but there is a certain amount of fun to be had being able to boot any “intel based” Mac OS X 😉
LikeLike
Sure, I have successfully installed 10.7 through 10.11 as a KVM virtual machine. I would suspect you could get the older ones working if you really wanted to.
LikeLike
Dear archedraft, thank you very much for the guides , unfortunately I’m completely desperate after putting about 100 hours in this 😦
Have you ever tried setting that up on a QNAP ?
Best billy
LikeLike
I’m having some trouble. Every time the vm starts, I get past the boot options screen then immediately run into a kernel panic. “Unable to find driver for this platform \”ACPI\””. Anyone else having this issue? I can paste the stack trace if necessary. I’m using unraid 6.2, which did change a lot about how virtualization works, so maybe that’s having an effect?
LikeLike